
5. Take and Prepare Mint Cuttings
-
Cut 4–6 inch stems just below a leaf node (where leaves meet the stem).
-
Remove lower leaves, leaving a few pairs at the top.
-
Place cuttings in water immediately if not planting right away.
6. Root the Cuttings in Water
-
Place cuttings in a glass of water with nodes submerged.
-
Keep in a bright location but out of direct midday sun.
-
Change water every few days.
-
Roots should form within 1–2 weeks (1–2 inches long).
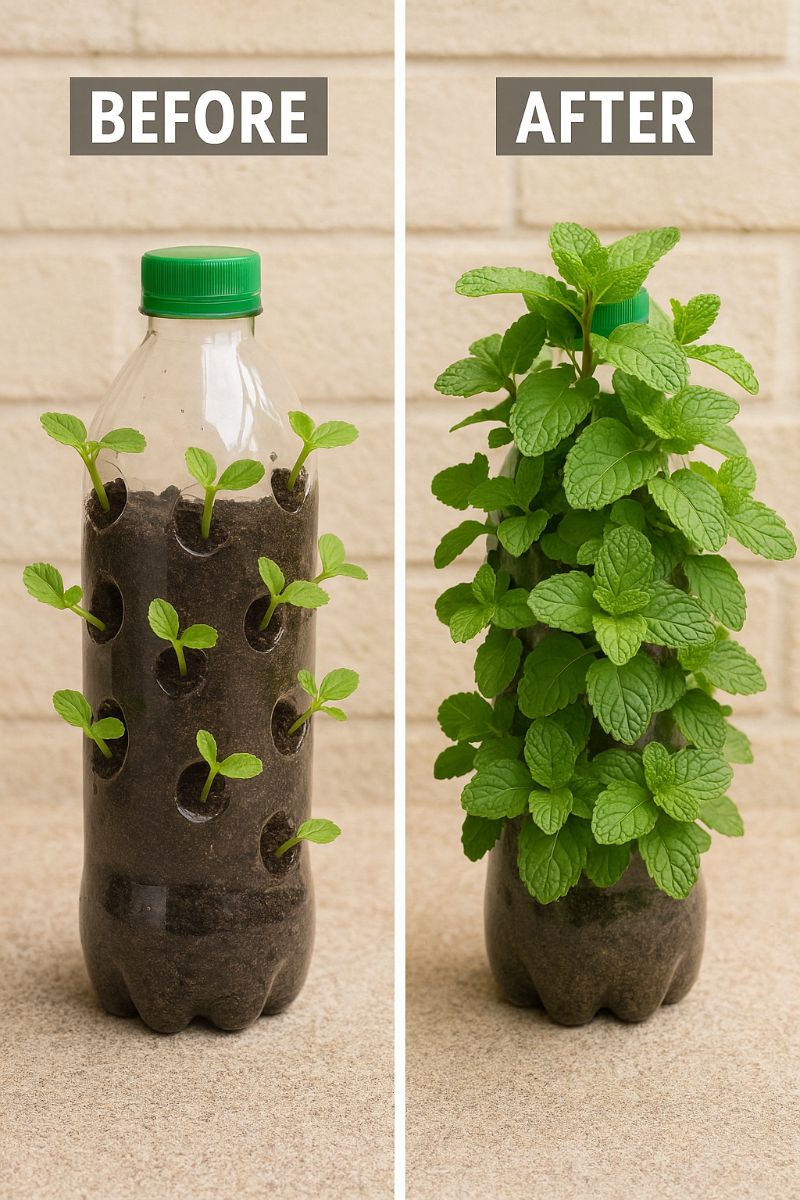
7. Transfer to Soil
-
Fill the bottle planter with potting soil, leaving an inch of space at the top.
-
Create a hole in the soil and place the rooted cutting inside.
-
Gently firm the soil around the roots.
-
Water thoroughly.
8. Hang Your Bottles
-
Thread string or wire through the holes at the rim to create a loop.
-
Hang from a balcony railing, trellis, or sturdy hook.
-
Choose a spot with 4–6 hours of sunlight daily.
9. Sunlight and Watering Tips
-
Avoid harsh midday sun that can scorch leaves.
-
Keep soil moist but not waterlogged. Water more frequently in hot weather.
-
Check soil moisture by touching it an inch deep—if dry, water immediately.
10. Maintain Healthy Mint Plants
-
Pinch back tips to encourage bushy growth.
-
Harvest regularly to keep plants productive.
-
Fertilize every 4–6 weeks with a balanced, water-soluble fertilizer.
11. Troubleshooting Common Issues
-
Yellow leaves: Usually caused by overwatering or poor drainage. Ensure drainage holes are clear.
-
Pests: Aphids and spider mites can be controlled with insecticidal soap or a mild water-dish soap solution.
Why This Method Works
Using hanging bottles makes the most of limited space while recycling materials. It also prevents mint from spreading aggressively in your garden beds and keeps plants accessible for daily harvesting.
5. Take and Prepare Mint Cuttings
-
Cut 4–6 inch stems just below a leaf node (where leaves meet the stem).
-
Remove lower leaves, leaving a few pairs at the top.
-
Place cuttings in water immediately if not planting right away.
6. Root the Cuttings in Water
-
Place cuttings in a glass of water with nodes submerged.
-
Keep in a bright location but out of direct midday sun.
-
Change water every few days.
-
Roots should form within 1–2 weeks (1–2 inches long).
7. Transfer to Soil
-
Fill the bottle planter with potting soil, leaving an inch of space at the top.
-
Create a hole in the soil and place the rooted cutting inside.
-
Gently firm the soil around the roots.
-
Water thoroughly.
8. Hang Your Bottles
-
Thread string or wire through the holes at the rim to create a loop.
-
Hang from a balcony railing, trellis, or sturdy hook.
-
Choose a spot with 4–6 hours of sunlight daily.
9. Sunlight and Watering Tips
-
Avoid harsh midday sun that can scorch leaves.
-
Keep soil moist but not waterlogged. Water more frequently in hot weather.
-
Check soil moisture by touching it an inch deep—if dry, water immediately.
10. Maintain Healthy Mint Plants
-
Pinch back tips to encourage bushy growth.
-
Harvest regularly to keep plants productive.
-
Fertilize every 4–6 weeks with a balanced, water-soluble fertilizer.
11. Troubleshooting Common Issues
-
Yellow leaves: Usually caused by overwatering or poor drainage. Ensure drainage holes are clear.
-
Pests: Aphids and spider mites can be controlled with insecticidal soap or a mild water-dish soap solution.
Why This Method Works
Using hanging bottles makes the most of limited space while recycling materials. It also prevents mint from spreading aggressively in your garden beds and keeps plants accessible for daily harvesting.
